Don't miss out on these other pages!

Class Schedule

(502) 370-7632 Joani

Please call or email us to reserve your spot.

Tuesday, June 29, 2010

I'm blowing it, I know...

I know, I'm blowing it.  I'm showing what I've made for the shoebox swap that I'm going to the end of July.  Hopefully those who are going to attend will "forget" about this post by then.  I just wanted to show you what I've been busy making. 

The theme of the swap is Christmas in July.  Trust me, I really did not want to make a Christmas card.  I fought with the thought on what to make for a couple of weeks.  Christmas will be here soon enough, no need to speed it up...  But I did see in one of the craft magazines that I get a lady wrote in and said that when she sits at her craft table and makes a card she does not get up until she makes one Christmas card, then by the time Christmas rolls around she is already done with her cards.  That is a GREAT idea, but I don't want all those stamps laying around all year either...

So, enough of that ~ let's see what I've been up to.
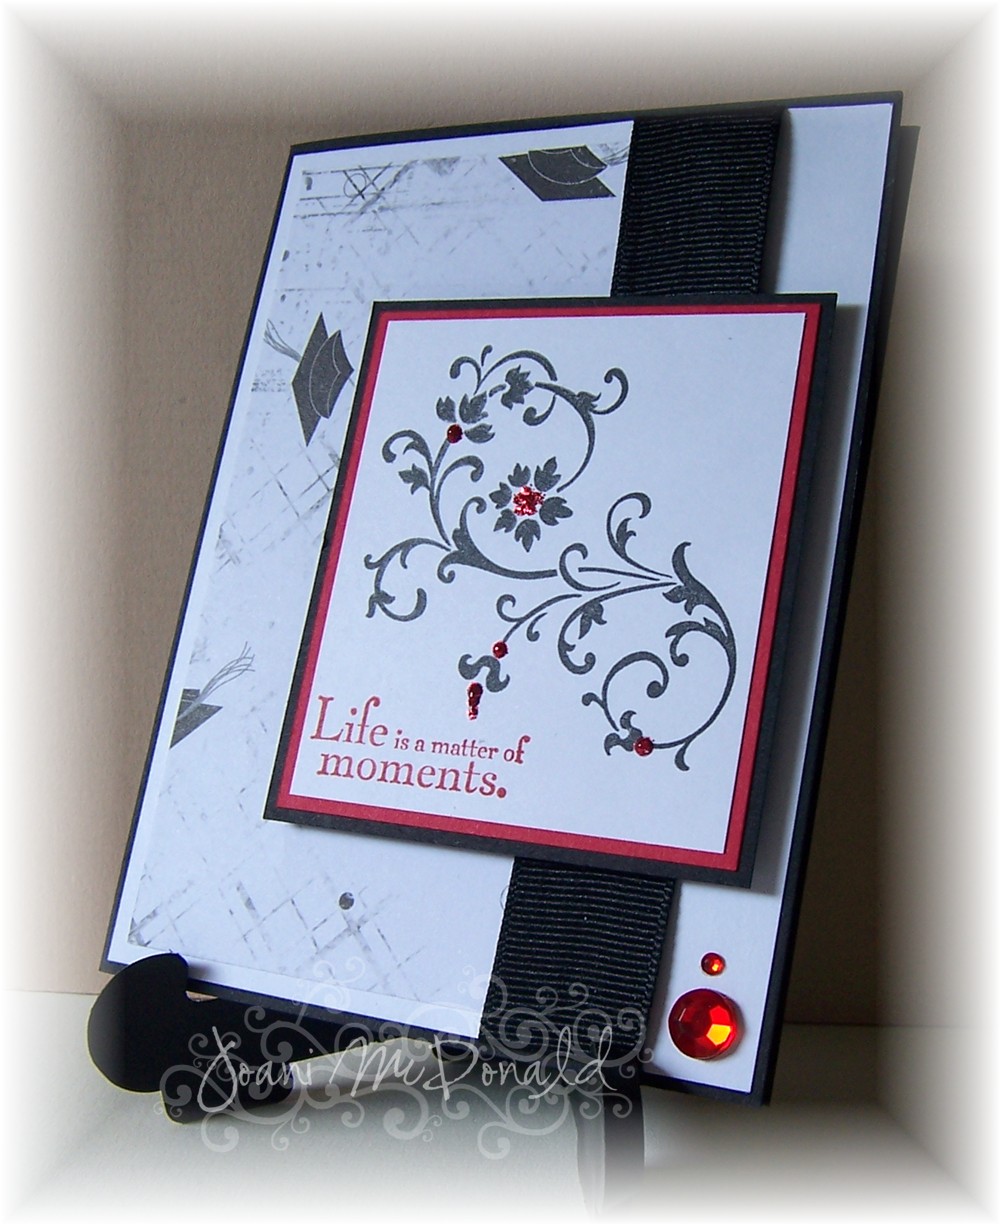
If you've been around my blog for a while you know that I don't really care to make Christmas cards with the traditional red and green.  I like to do blues and purples, colors that are not so traditional.  I tend to step out of the box ~ as I did with this card. 

The base of this easel card is Ballet Blue that I layered with white, Pacific Point and some DP from Paper Pizzaz and Imagine That.  I stamped the image from SU! Polar Bears and only had to color in their scarfs.  I cut the image panel and the Pacific Point layer out with my nestie small and large circles.  I also stamped the stars and colored them in with gel pens to give it a little shimmer.

I stamped the sentiment from the same set in with Ballet Blue ink and hand cut it out with the Pacific Point layer I adhered it to.  I had some scrap Ballet Blue left from making the card and I used my scallop border punch and used that on the center of the bottom piece.  I then used my jumbo snowflake punch and punched a bunch of white and Ballet Blue snowflakes.  I used my sakura gel pen on half of the white and half of the Ballet Blue flakes and adhered two to the top and two to the bottom of the easel card.  I then used a pop dot to adhere the stars over the top of the snowflakes on the top of the easel and I adhered a half pearl to the bottom ones. 

It it a quick card except for all the cutting...  But I like how it turned out.

Now my stocking stuffers...
I can't show you what is inside because that would really blow the surprise, but showing you the outside is ok.

I used the tutorial on SCS for these treat holders ~ it was VERY simple.  I cut a sheet of dark blue card stock and followed the tutorial.  I them took my snowflake embossing folder and embossed the front panel of the treat holder.  I then cut the flap with my scallop edge punch.  I folded the front flap down and punched two holes side by side with my 1/4" circle punch.  I added the goodies inside and then threaded the ribbon thru.  The tags were cut with my tag punch out of the dark blue and white card stock.  I stamped the sentiment from TAC's Fall/Winter gift with purchase stamps in Brilliant Blue then threaded the silver cord thru the ribbon.  Finally I took my jumbo snowflake punch and punched a white snowflake and added some stickles and I was complete.

That's all I've got for you today.  The next few days will be busy for me - I've got some personal things going on.  I will try to get back here, but if I don't I'll be back for sure at the end of the week.

Have a super great day!!

Monday, June 28, 2010

Ricky's pool table...


This is what I made for Ricky for his birthday.  Now he's a guy in every meaning of the word and well, he really does not care too much for all the boxes and things that I make.  He does not know why I get all worked up when something does not work out well ~ but when I saw this I had to make it.  I forgot where I got the idea from, but I will edit this post later to add that. 

I thought that I would make this box for him to hold the cards that I've made for different occasions over the years for him.  He used to be a pool player, so I knew that it would be ok
It's deep enough to hold quite a few cards, that's why I liked it!  I made the box out of Close to Cocoa and pretty much everything else was made out of scraps, how cool is that??
And before anyone says anything ~ I know that there are not 19 balls in pool.  The 19th was his birthday so that's why I put "19" on the ball...  Yes, a little goofey....

That's what I had for today ~ I will edit this later to let you know where I got the pattern from.

Have a super great day!!

EDITED TO ADD:
The blog where you can go to for these instructions is:  http://www.stampndesign.blogspot.com/ and trust me, you'll be blown away with Lynn's talent!

Friday, June 25, 2010

For my King of the Grill

Good morning everyone and happy Friday!  I hope that today finds you well.  I wanted to show off the card that I made for hubby for Father's Day.  I "borrowed" this set from Joyce when she was here - and it was perfect for Ricky.  He is kind of a little firebug when it comes to the grill.  And I had wanted to get him a new gas grill, but with the unexpected medical bills looming in the distance it will have to wait just a bit.  But enough of that, off to the card...
As you can see the card is 9" x 4" and for the base I used Not Quite Navy that I layered with Chocolate Chip, Lt. Blue Bazzill cs and some DP from Creating Keepsakes.  I stamped the image and colored it in with my pencils and gamsol then sponged the background with Ballet Blue and Close to Cocoa inks.  I stamped the sentiment in with Chocolate Chip and punched it out with my word window punch and layered it on to a piece of Pumpkin Pie and then a piece of Not Quite Navy.  I used my small and wide oval punches for those layers.  I attached the image panel to a piece of Not Quite Navy and layered it on to a piece of Lt. Blue Bazzill cs.  I added a piece of the DP to the front of the card.  I had a small scrap of Not Quite Navy and the Lt. Blue cs that I added a couple of orange eyelets to before adding the sentiment with a pop dot.  Once the whole card was completed I added some stickle stars and I was done.
He did like the card, however I would of loved to get him the grill to go with it ~ that would of been the ultimate in coordination Ü

I hope to be back tomorrow to show you more, if not I wish you a great day and a super weekend!

Wednesday, June 23, 2010

My late Mojo...

A few weeks back I was going to take part in the Mojo Monday challenge.  I had all good intentions on it.  I had my card made in time, I just neglected to post it.  So now cleaning out my camera I noticed that I had not posted it ~ so here goes.  A day late, a dollar short...
This was for the Mojo Monday sketch 142.  My base card is Certainly Celery that I layered with Basic Black and some old DP from SU!.  I punched the edges of the DP and the Basic Black with the embossed diamond punch from Martha Stewart (thanks Betty!!).  I then added the ribbon to the panel before I adhered it to the card.  I stamped the image from my Fresh Cuts set with black ink and used my chalks to add a little color here and there.  I layered that on to a piece of Certainly Celery and Basic Black ~ I then added a couple of little scraps of ribbon to the back before adhering the panel down to the card.  I took a couple of rhinestone jewels and added them to the panel where the ribbon meets the image.  I added a butterfly and some more jewels to the top right side for a little more bling.
Once the card was all put together I added some stickles to the front panel here and there and I was  complete.

Do you like??  I hope so, that's why I do it ~ to share ideas with everyone.

Have a super great day and stay cool!!

Tuesday, June 22, 2010

Hello everyone, happy Tuesday!

Just a quick note...  I wanted to pop in and let you know that I will not be posting today.  Our dear friend is leaving this afternoon and I want to spend some more time with her.  We won't be seeing her again for another year so I want to squeeze just a little more time in.

I'll be back tomorrow ~ and if you didn't see the tutorial that I posted yesterday you can just scroll down to view it.  Also, I'm working on a tutorial page ~ did you see it??  Just look at the top of the screen under my header and you'll see a tab that says "Tutorials".  I am listing them on there with a link back to the original post for easy viewing.

Thanks for understanding and have a super great day!

Monday, June 21, 2010

Easel Box Tutorial

I hope that today finds you well, and that your weekend was a great one.  Father's day was a nice quiet one here.  Well, quiet for the most part.  It's been hot outside so we decided to give Dixie a bath out back.  An hour later and a couple of sunburns and she still had soap left on her.  The wacky dog!  She loves it outside when it's raining but when it comes to bath time she hates it.  Oh well ~ enough of that, you stopped in for the tutorial so here it goes.
Here's what I gathered to make the easel box.  And if you need to just click on the picture and it will bring it up larger for you to view ~ then just hit your back button to be brought back to here.  Ready, here goes...
You will take a 6" x 9" piece of card stock and score the 6" side at 1" and 5".
Then turn your paper to the 9" side and score at 4" and 5".
You will snip the center flaps up to the 1" line.  I like to cut out a little of the flap on my corners and flaps when I make boxes.  It helps when your are putting boxes together.  Now set this aside for now.
You will now take a coordinating piece of card stock (I used Ballet Blue for this box) and cut it at 7 7/8" x 7 7/8" and score all 4 sides at 1" and 2".
Now you will cut out the "L" shape from each corner.  Then notch the 4 corner flaps like in the picture below ~ similar to what you did on the last piece.
This is the hard part for me to explain so I have a couple pictures to show you.  Pre-fold all the score lines first.  Then you will add adhesive to the outer flaps.  Take the small flaps and tuck them in and fold them between the outer and inner wall folds.
This is what the drawer will look like when the flaps are tucked in and the outer flap is glued down.
Now repeat with the other sides, you just wont have flaps to sandwich together.
Now we will work on the easel part.  You will cut a piece of card stock at 4" x 8".  Score the 8" side at 2" and 4".
You will take another coordinating piece of card stock and cut it at 4" square.  Decorate your 4" square piece and the bottom 4" of your easel card that we just cut. 
Now add your 4" square piece that will be your top and add it to the 2" score piece of the easel.  Remember to apply adhesive to the 2" square only.
After decorating your piece and adding it to the easel it is time to adhere it to the box top. Take the 6" x 9" piece that we first worked with and we are going to adhere it to the base.  I found it a lot easier to add it to the box top before gluing the box together, you don't "mash" the box this way.  Add your adhesive to the 4" underside of the easel and attach it to the box top.
Now you will put your box together so the drawer can fit into it.  Apply adhesive to each top inside flap.  The little short flaps will be sandwiched in between the two longer flaps.  I did it this way so the drawer can move in and out of the box freely and not be hung up on the short flaps. 
Here is another view of the 'sandwich' on how the flaps are.
All you have to do now is put the drawer in and you should be complete.
Here is a picture of the box with the easel down and the drawer closed.  It is perfect to add some 3" x 3" note cards in or some cute embellishments.  The possibilities are endless...
I'd love to see what you came up with.  Post a comment and add a link and I'll stop by and take a peek.  If you have any questions just be sure and ask and I'll get back to you as soon as I can.

Have a super great day!!

Friday, June 18, 2010

Where have I been? And happy Friday Ü


Hello everyone!  First I'd like to say that I am sorry for the lack of posting.  It's been a busy time here at our house.  With Danielle's graduation and Joyce being here.  Then earlier this week we went to Louisville and stopped in at Archiver's and another store that we were told about (thanks Anne!) called Dee's.  I so wish that we went there before Archiver's.  Oh, don't get me wrong ~ I love Archiver's, but it seemed that they really did not have all the great stuff that I remember in my last trips.  Maybe that means that I already have enough??  Ü
And this weekend brings Ricky's birthday and Father's day.  Joyce will be going home Tuesday too.  We will all miss her so much.  This time she was here with us almost 6 weeks and the time has flown by.  As it always does, as I'm told it will the older I get.  Anyway ~ I am here to say that I am so sorry and I will be back to regular posting probably next week.  BUT to keep you going I want to show you a little of what I've been doing in the craft room during some of our fun times...
Betty wanted me to figure out these boxes for our next get together so I figured it out and made one for her.  It's adorable, huh??
Here is an up close picture.  I've actually made a tutorial on how to make them ~ I'll post that in the next couple of days for you.

So once again, thanks for hanging in there with me.  I'll be back in the next few days and post the tutorial for you.  These really are very easy to make and they turn out so darn cute!

Have a super great day - and stay inside where it is cool.  Preferably at your craft table!

Monday, June 07, 2010

Happy Monday!

Good morning everyone!  Happy Monday to you.  I hope that today finds you well.

So, do you all have your Father's Day cards made?  You do realize that Father's Day is approaching fast.  Hubby's birthday is the day before, so I have a double whammy this year.  It will be a weekend long celebration. 

I've got a few cards that I made for birthdays that are a little masculine, but they can easily be adapted for Father's Day.  I don't have all the info for these cards but I do remember the names of the set's.  If you need more info just leave me a comment and I will find out for you.

Wanna peek?  Of course!  So here goes....
This stamp set is called Farm Life.  The case card is Chocolate Chip that I layered with Close to Cocoa, Creamy Caramel and Kraft papers.  I water colored the image.
This is also the Farm Life stamp set that I used.  I masked the image to create the scene.  I also water colored this image. 
The stamp set I used here was Nobel Deer.  I love this set, it is really a masculine set.  I used chalks to color in this image. 
This is also stamped with Nobel Deer.  I colored this in with my pencils and gamsol.  The DP papers used on this card are from Prima.  I've had these papers for a long time and I use them sparingly.  The circle stamp is from The Angel Company called Circle Sampler. 
One last card from Nobel Deer.  This image was colored in with my pencils and gamsol also.  The DP used here was from Anna Griffin
Lots of coloring went into this card.  I used my watercolors, pencils and markers to color in this image.  The stamp set I used is an old SU! set called Times and Seasons.
The image used on this card is from Rubber Monger and I colored it in with my pencils and gamsol.  Notice a pattern?  I tend to use the earthy colors for guy cards.  No bright and cherry colors, I try to keep them earth tones.
This image is from Lovely as a Tree.  It is a classic set that I like to turn to for guy cards.  The DP is from K&Company and I used my oval nestie to create the "mask" to stipple ink on to the image panel.

Friday, June 04, 2010

Last of the Elements of Style, promise!

This is the last of this stamp set, I promise.  I just love it and I've had to get my use out of it while Joyce is here ~ I know that you'd do the same Ü

I'll get to it so you wont have so much blah blah to look thru, it's Friday and I know that I want to do some blurfing myself.
The base card is Ballet Blue that I layered with Purely Pomegranate and Bashful Blue.  The Bashful Blue piece I used a background stamp on that I purchased from Judikins many years ago with Close to Cocoa ink.  If you'd like to do a search for it the code number is 2672J.  I stamped the image with India Ink and I used my watercolors to color in the images then I sponged some ink around the edge of the panel.  I punched the holes in the panel with my slot punch and threaded some ribbon thru it before I adhered the panel to the card.  I then added some stickles on the flowers and I was complete.  I'm sorry for the picture, the stickles show up awful ~ my camera was not cooperating so here is an up close picture that is a little better.  Not much, just a little Ü
There, how's that? 

The next card I made for Danielle for her graduation.  It's not what I wanted.  So often lately I've come up with ideas and I sit to make the card and it sure does not come out the way my brain thought of it.  And then she comes home from school and says that her cap and gown will be blue.  BLUE??  What??  The school colors are red, black and white!!  I have no idea where the blue came from.  Their mascot is a cardinal.  Hell-o!  A cardinal is RED.  Oh well, the card is already made and I've written my heartfelt sentiment in it - there is no turning back now.
The base card is Basic Black that I layered with white and Real Red card stock.  The DP is from TPC Studio.  I stamped the image in with black ink and the sentiment on the front is stamped in Real Red ink.  I added a length of ribbon and the jewels to the card, some red stickles for a little more color and I was complete.

Thursday, June 03, 2010

My Elements of Style

Howdy and good afternoon!
I thought I'd pop in and show you what I've been up to.  Joyce is still here and I'm taking advantage of the stamp set that she purchased from Betty, it's called Elements of Style.  It is so pretty and I'm sure that you'll see a few cards from me using this stamp set.
It's so super pretty!  And it's a perfect set to use your watercolors with.  I stamped the image with India Ink and used my watercolor crayons to color the image in.  I set it aside and started the base card.  I used Basic Black and layered it with a white panel that I stamped the other image from the set with black ink also.  I then layered the image on to a piece of Basic Black card stock then I added that panel to the card.  I stamped the bird, also from the set, with Rose Red ink and cut it out and used a pop dot to add it to the card.  The inside I used a piece of Pretty in Pink card stock and stamped the scroll image with black ink and the sentiment with the Rose Red ink.
You can see that I used my sakura gel pen on the flowers for a little touch of glimmer.  Very pretty, huh?  I love the delicate look that this stamp set can give when you color it in with watercolors.

So this is what I've been up to, what have you been doing?  Have a super great day!  I'll see you back here tomorrow Ü

Wednesday, June 02, 2010

Happy Hump Day everyone!

I hope that you are having a great Wednesday morning.  It's kinda gloomy here, but it's supposed to be hot, hot, hot today.  I'm going to play turtle and not poke my head out the door unless it's absolutely necessary.

I had plans on being a part of the Softpencil customer blog hop last week - but with our scare here I was not able to, so I am going to show you the cards that I made for the hop.
Here is the first card that I made.  I used the Molly in Spring digi for this card.  I'm sorry but the paper once again does not have a name listed on it.  The ribbon was some that Betty gave me last year and I've saved it for just the right card.  The base card is So Saffron that I layered with Certainly Celery and some DP.  I used my pencils and gamsol to color the image.  And there are some rhinestones in the left bottom corner for a little "bling".
Here is an up close look at the image.  I used a sakura gel pen on the butterfly trail and some of the shimmerz paint on the hair bows and dress.  I then outlined the image with a copic marker. 
This is another one that I made for the blog hop.  It is also the Molly in Spring digi.  I cut it out with my circle nesties.  The base card is So Saffron that I layered with a piece of Pink Pirouette that I ran thru my cuttlebug with my swirls folder and the DP paper is from Paper Pizazz that I purchased from Paper Wishes a while back.  I added some old buttons to the card and 3 half pearls from Martha Stewart and I was complete.

I hope that these give you some type of inspiration!  And I do hope that Soft Pencil does another customer blog hop soon because I would love to be a part of it!!  Have a super great day, and I'll see you tomorrow!