Don't miss out on these other pages!

Class Schedule

(502) 370-7632 Joani

Please call or email us to reserve your spot.

Showing posts with label Easel Card. Show all posts

Thursday, January 31, 2013

A Little Valentine

From me to you!  I've been working on some Valentine's that I need to get in the mail ~ but I remembered to take pictures first!

I just love the line of stamps by Art Impressions.  Some of the ladies they have SO remind me of Mom, Joyce and I.  We could get ourselves into some pretty crazy situations and it's almost like someone followed us around with a camera :)  Actually when I went to Scrapfest last year I met the ladies of Art Impressions.  They were so down to earth and nice.
I just love to make easel cards, they are also so fun to display.  I'm still not sure but I may give this one to hubby for Valentine's Day!
 
I do want to say sorry for all my pictures in advance.  My lovely daughter spilled soda on my camera and I've had to use hers.  Of course hers is a lot newer than mine, but I just can't get the hang of it.  My old camera was just perfect.  So once again in advance, sorry.
 
I hope to be back tomorrow to post some more pictures for you!  Have a nice evening!

Thursday, January 13, 2011

Easel Flower in a Box?

Yes, that's what I said ~ Easel Flower in a box, or Corsage Box.  I love fresh flowers but they fade so fast.  So how would you like to give a flower that never dies?  That's what I've got here.  An easel card with a flower topper all wrapped up in a box ready to give as a gift.
All wrapped up and pretty.

 See the little pearl in the center, nice touch huh?
It was truly easy to do, and fast.  This would adapt perfect to make a Valentine also.  Hmmm, maybe that will be my next project.

Oh, and please if you will don't forget to pop on over to my Stampin' Up blog and see what great things are going on there too.  You can get there if you click HERE or any time at the top of this blog just click on the "My Stampin Up blog" button.

Have a super great evening!

Tuesday, August 31, 2010

A little Tess

Good morning folks ~ I hope that today finds you well.

I've been lucky enough that Betty let me borrow some of her stamps again, and this time it's Tess.  At first I really did not care for it - til I touched it.  Once I touched it I loved it!!  I love the chef from the Voilà' set too because like Tess you can paper piece it.  So you wanna see what I did with it?  Of course!
I wanted to make some easel calendars that are still good for the rest of this year, that's what these are.  The base is Garden Green that I layered with Chocolate Chip and Brocade Background DP.  I stamped the image from Tote-ally Tess and colored parts of her in, then paper pieced the rest with scraps.  I stamped off the bag and rubber stamp in her hand, colored them and cut them out and added them to the main image. 

Isn't she just adorable!!  I love to paper piece - you can get such a different look than just coloring an image.  And if you use the scraps from the papers that your using you get a matched look.

Here is another calendar made with Tote-ally Tess.  The base measures 4 1/4" x 5 1/2" so it will fit into a regular A2 size envelope.  I stamped the image from Tote-ally Tess and colored her in with pencils and gamsol and paper pieced the rest.  The DP is called Brocade Background from SU! but it is discontinued, sorry.  I also used River Rock, Chocolate Chip and Garden Green card stock.  The punch I used across the middle was from Martha Stewart and the Chocolate Chip layer under the image panel was cut out with my Cricut Storybook cartridge, as was the green flourish in the bottom right corner.  The paper rose I made with some Creamy Caramel paper. 

To get this size easel I took a piece of card stock that was 5 1/2" x 11" and scored it at 5 1/2" and 8 1/4".  The front panel was 4 1/4" x 5 1/2" that was decorated.  Easy Peasy......

Ok, now I will share with you something that I did and while I was doing it I thought "you dummy".  Take a peek at her bag.  Can you see all the little pieces?  I stamped her bag twice on to the DP.  One of the bags I cut the handles off of, that was used at the back of the bag.  I stamped the little images, the pen, the rubber stamp, the card and the scissors and cut them all out and placed them in her bag.  I put a piece of tape on the "back" of the bag and adhered the pieces down.  I then placed the "front" of the bag, the piece with the handles over that.  Using the "back" of the bag gave me the placement to put Tess' tools in her bag and it also gave a little dimension to the bag.  Yup, I'm
crazy!!

If you are wanting the link to the calendars I had got them off of Splitcoast Stampers.  Cat has posted each year these wonderful calendars for everyone.  The link to the rest of 2010 is HERE and if you'd like the 2011 calendar you can get those HERE.  THANK YOU Cat, these are awesome!

I'm always in need of a calendar - so I keep one at my desk, one at my craft table, one in my purse, one on the refrigerator...  So these work out great.  And best yet, they fold flat so you can mail them out to friends and family.

Hope you enjoyed my post today!  Have a super great day, and I hope to see you tomorrow.

Wednesday, August 18, 2010

Did you figure it out?

I'm sure that you did...  Yesterday's sneak peek...  It was a pretty easy one.  I made some more post it note holders, however these are easel post it's.  I love to make the easel cards, and I thought the post it's were a perfect size for them.
How stinkin' cute are these?  They are so easy to make too!!  You know that I love to make the easel cards, well these are the same as that ~ instead of decorating the "card front" you add your post it notes.
The bases for these are made with Bazzill paper that I added DP to. 

The pink one is decorated with Rose Red and Pretty in Pink card stock and Petals and Paisley DP.  I used my designer label and small oval punches.  The word "notes" was a stamp from The Angel Company that I stamped with Rose Red ink.  The stamp set used was called Vintage Vogue that I stamped on the post it pad with Rose Red ink.  If you notice the prima in the lower right corner?  I stamped a flower from the Vintage Vogue set with Rose Red ink on to a piece of Rose Red paper, cut it out and added it to the center of the prima with a dew drop to the center of that.

The blue one is decorated with Soft Sky and Not Quite Navy card stock and Petal Patch DP.  I did the same with the punches and used Not Quite Navy ink on this one. 
The easel base of this is also Bazzill card stock.  I decorated it with Perfect Plum, Apricot Appeal and Lavender Lace card stock.  I used some old DP called Sweet from SU! I used my designer label and small oval punches and  I stamped the word "notes" from The Angel Company with Eggplant Envy ink.  also stamped the border from Vintage Vogue on the notepad.  The butterfly cut out with the Beautiful Butterflies die from SU! that I had cut out a while back.  I added some ribbon and rhinestones to jazz it up a bit.

This is the last one that I made.  I made all these before dinner the other night, they go so fast!!

The base of this is made with Bazzill card stock.  I used Chocolate Chip, Pink Passion, Pretty in Pink and Pink Pirouette card stock.  The DP is old from SU! called Rebecca.  I stamped the border from Vintage Vogue in Chocolate Chip ink, the same as the word "notes" from TAC.  I used my designer label and small oval punches on the sentiment.  The butterfly is cut out with the Beautiful Butterflies die in Pink Pirouette card stock.  This is also jazzed up a bit with some rhinestones and ribbon.

I hope that you like these and that they inspire you to make some.  You can get some really good deals on post it notes now.  I noticed them on sale at Walmart because of back-to-school.  Leave me a comment with a link to yours, I'd love to see them!!

Have a super great day ~ and make sure to come back tomorrow, you'll love to see what I'm going to post!!

Monday, June 21, 2010

Easel Box Tutorial

I hope that today finds you well, and that your weekend was a great one.  Father's day was a nice quiet one here.  Well, quiet for the most part.  It's been hot outside so we decided to give Dixie a bath out back.  An hour later and a couple of sunburns and she still had soap left on her.  The wacky dog!  She loves it outside when it's raining but when it comes to bath time she hates it.  Oh well ~ enough of that, you stopped in for the tutorial so here it goes.
Here's what I gathered to make the easel box.  And if you need to just click on the picture and it will bring it up larger for you to view ~ then just hit your back button to be brought back to here.  Ready, here goes...
You will take a 6" x 9" piece of card stock and score the 6" side at 1" and 5".
Then turn your paper to the 9" side and score at 4" and 5".
You will snip the center flaps up to the 1" line.  I like to cut out a little of the flap on my corners and flaps when I make boxes.  It helps when your are putting boxes together.  Now set this aside for now.
You will now take a coordinating piece of card stock (I used Ballet Blue for this box) and cut it at 7 7/8" x 7 7/8" and score all 4 sides at 1" and 2".
Now you will cut out the "L" shape from each corner.  Then notch the 4 corner flaps like in the picture below ~ similar to what you did on the last piece.
This is the hard part for me to explain so I have a couple pictures to show you.  Pre-fold all the score lines first.  Then you will add adhesive to the outer flaps.  Take the small flaps and tuck them in and fold them between the outer and inner wall folds.
This is what the drawer will look like when the flaps are tucked in and the outer flap is glued down.
Now repeat with the other sides, you just wont have flaps to sandwich together.
Now we will work on the easel part.  You will cut a piece of card stock at 4" x 8".  Score the 8" side at 2" and 4".
You will take another coordinating piece of card stock and cut it at 4" square.  Decorate your 4" square piece and the bottom 4" of your easel card that we just cut. 
Now add your 4" square piece that will be your top and add it to the 2" score piece of the easel.  Remember to apply adhesive to the 2" square only.
After decorating your piece and adding it to the easel it is time to adhere it to the box top. Take the 6" x 9" piece that we first worked with and we are going to adhere it to the base.  I found it a lot easier to add it to the box top before gluing the box together, you don't "mash" the box this way.  Add your adhesive to the 4" underside of the easel and attach it to the box top.
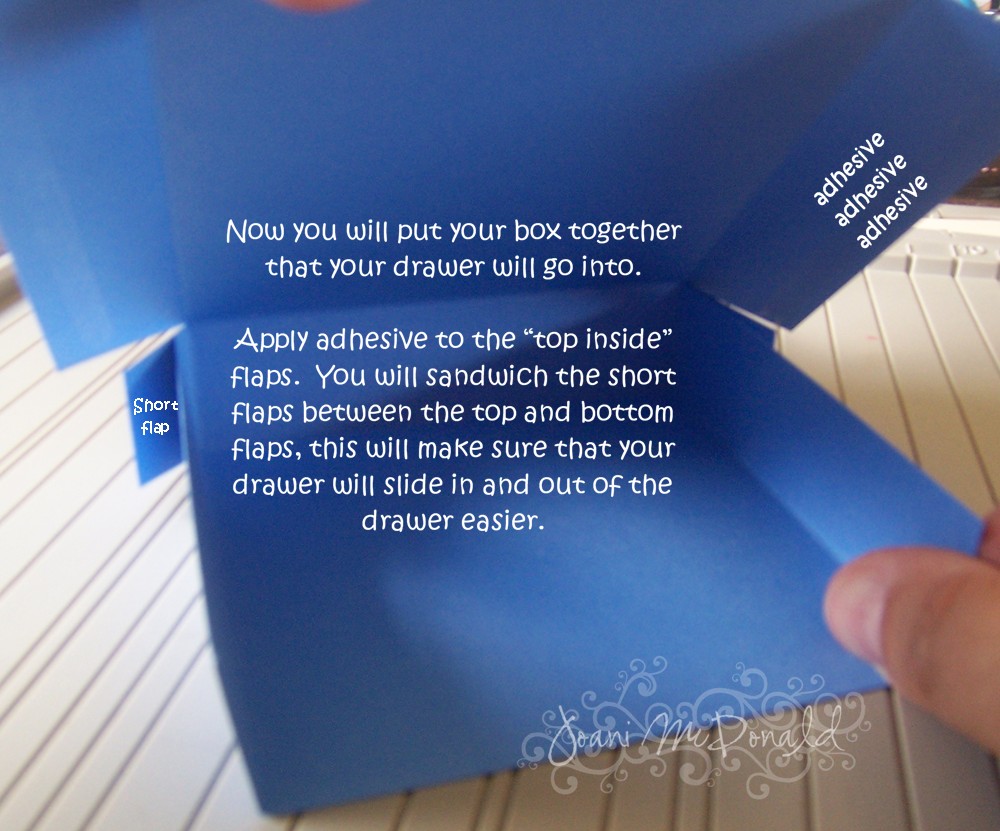
Now you will put your box together so the drawer can fit into it.  Apply adhesive to each top inside flap.  The little short flaps will be sandwiched in between the two longer flaps.  I did it this way so the drawer can move in and out of the box freely and not be hung up on the short flaps. 
Here is another view of the 'sandwich' on how the flaps are.
All you have to do now is put the drawer in and you should be complete.
Here is a picture of the box with the easel down and the drawer closed.  It is perfect to add some 3" x 3" note cards in or some cute embellishments.  The possibilities are endless...
I'd love to see what you came up with.  Post a comment and add a link and I'll stop by and take a peek.  If you have any questions just be sure and ask and I'll get back to you as soon as I can.

Have a super great day!!

Thursday, April 08, 2010

A couple of my favorites...

I'm here today, barely...  Yesterday was what I call "run around day" at the McDonald house.  The neighbors must of thought that I was crazy with all the in and out's I was doing yesterday.  I had to take Danielle and Mom everywhere.  I put a few miles under my belt I should say, and that was just in town driving.  And then this morning I wake up to find the day gloomy.  The weather's been so pretty out and now today is gloomy ~ or what I call 'funeral weather'.  All grey and blahhhh!!

So I think that I'll show you some perky, cheerful cards.  How's that?  To take away from the dull drums.
Here is one of the cards that I was working on to sell a while back.  I just love that chef from the Voila set.  I love to paper piece him whenever possible too!  And once again paper from the Sweet Always collection.  That's one favorite that I'd love for SU to bring back!  The image fits perfect on the easel cards too!  So wadda ya think?
Now how cheerful and bright can you get with this card?  I love the set Time Well Spent.  A while back I asked a friend of mine, Keersten, if she'd stamp some images for me because I knew that her being a SU! demo had received this set.  She said that she had not even put it together that she did not care for it and she sold it to me.  Yes Keersten, you loss was my gain Ü I've used this set SO many times - It's one of my favorites for sure!!  Thank you!

So I made a flower pot card and stamped and cut all those flowers out.  What better to do with them than to add stickles to all the flowers?  That really made them pop!  It was a lot of cutting but it does not bother me because like I said it's one of my favorites...
I've also got a digi page here of Dixie this past winter in the snow.  She loved being out in the snow and cold.  These past few days when it's been warm she's been kinda lazy and not wanted to go outside.  Today it rained and it's a little cooler and she's been outside most of the morning.  Crazy girl!!  But it's her first spring and she's not sure what to make of the changing seasons.  Now if I could only stop her from chasing the bee's and wasps!

I hope that you all have a wonderful day!  I'm now off to create!

Wednesday, February 17, 2010

My Cupcake Easel's

I was in a mood the other day to make some easel cards and I got some new set's from The Angel Company and had to use them.  My hands were just itching to ink up those cuppy cakes!!  And with all the snow around there was little else I could do ~ so here we go!!
This was my first one.  I used Chocolate Chip for the base and the layered it with Old Olive and some DP from Imaginisce.   I used my new nesties Labels 9 to layer under the girl.  The image is from The Angel Company set called Cupcake Cuties.  Some ribbon, a button.  See the bottom layer?  I used my new Scallop Trim Border punch from SU! and I added a little button, too!  Adorable, huh?

This one is really girly with all the pink, but I know just the person who will be getting this in the mail.  This image is also from Cupcake Cuties and the base card is Pink Pirouette that I layered with Pixie Pink and some DP from Hot off The Press (that I've had forever!!).  The ribbon is Rose Red from SU! and I used my Labels 9 nestie to cut the images on the main panel then I used my CB Swiss Dots folder to emboss it.  The bottom layer I used my Scallop Trim border punch.  I also did some paper piercing and faux stitching around the outer edge.
This was my last easel card.  The base is Barely Banana that I layered with Certainly Celery and some DP from Imaginisce and Hot off The Press.  I used my CB and ran the Certainly Celery paper thru with my Swiss Dots folder (can you tell, it's one of my favorites) and then cut it out with my nestie Label 1.  Some ribbon, a button, my SU! scallop trim border punch and I was complete.

If you'd like to try your hand at an easel card go to the SCS resource page and pull up Easel Card ~ or just click HERE and it will take you there.  I love to look every Wednesday and see what new technique they are doing.  And make sure you take a look in the gallery set aside HERE for these cards ~ I'm sure that you will find lots of inspiration!  This one was a while ago, but it's so much fun - quick and easy ~ and even better yet it fits in an A2 envelope!

Have a great day everyone!!

Tuesday, November 10, 2009

My take on the Easel card

Howdy everyone ~ I'm still here and kicking. Just life like I've said before.  I'm getting ready for the bazaar this week.  Thursday Betty and I are going to set up and then the sale is Friday and Saturday.  It's inside and I'm looking forward to this one.  If everything does not sell I plan on putting it up on Etsy.  I can probably have Danielle take a few things to school for her teachers - but she's getting too old to give little things like this to her friends.  I've tried, she says "Mom, my friends aren't like that".  HUH?  Like what??  Oh well, the mind of a teenager...

You ready for my take on the easel card?  I kept it kinda basic for now.  Whenever I make something for the first time I try to keep it basic so if I mess it up I wont feel so bad that I put too much time, effort and supplies into it.

The base is Chocolate Chip that I layered with Ballet Blue and some Linen Vanilla cs.  I stamped the image from Sleigh Bells Ring in Close to Cocoa ink and attached it to the card.  At the bottom base of the card I used some DP from Merry Moments and stamped the sentiment and holly image in Close to Cocoa also.  I then stamped the holly once more on a scrap piece and colored it with pencils and gamsol, cut it out and attached it to the base with pop dots.  Lastly I added some stickles to the main image and I was complete.

This is a side view so you can see how the card set's up by itself.  Kinda cool huh?  If you go to SCS HERE this thread will give you the directions on how to make this card.  It is actually very easy, it just looks intimidating.  If you go to the gallery on SCS and type in TLC242 it will bring up all the other cards that are posted ~ there is quite a few beautiful ones there, plan on spending some time.

That's all that I have for right now.  I hope to show you some more later today.  Have a great day!!