Don't miss out on these other pages!

Class Schedule

(502) 370-7632 Joani

Please call or email us to reserve your spot.

Showing posts with label Hero Arts. Show all posts

Friday, December 18, 2009

Happy Friday!

I can not beleive that next week is Christmas!  Where the heck did the time go to?  I'm not ready for the year to end and the next to start.  My little girl will be leaving us for college soon.  I so have to get started on all that.  But seriously, when did she grow up?  When did I get all this grey from? 

I've been working on some more Christmas cards ~ wanna see?

One of my favorite stamp companies is Darcie's.  I used to love to go to the shows in CA and pick up their images.  I've got quite a few of them - Danielle has quite a few of them too.  And this little guy is one of them.  They used to sell their UM stamps that were "seconds" in a bin and most of them were $1.00!!  I can hardly ever see the "ooops" on them - can you??

I wrote down the recipie for this card and now I can't find it ~ sorry.  I know that the base card is Garden Green and that I used Chocolate Chip and Garden Green nesties but I cant remember the name of the DP.  It is SU! but I just don't remember which collection it was from, sorry.  The sentiment is from Hero Arts and I used my Stamp-a-ma-jig to place it so I could use my oval punch on it and I punched a piece of Garden Green with my Super Jumbo Marvy punch.  I also added some fun flock to the hat for a little added touch! I guess I do remember more than I thought, huh?

I'm off to make a few more things for Danielle to hand out.  I've still got to shop for hubby - all else is done.

I hope that you all have a great day!

Tuesday, June 23, 2009

Sorry for my lack of posts...

I'm sorry for my lack of posts the past few days. I've just been busy and Joyce is leaving tomorrow. I just popped in to show you a couple of things ~ I've felt bad for not posting.

I hope that you all had a wonderful Father's day weekend. We had wanted to do something outside this weekend but it was just to dang hot!! Not the kind of hot that you can just sit in the shade to stay cooler ~ it was HUMID hot. That kind of hot you can't get away from unless your sitting in a water bucket.

Ok, enough of that ~ let's just get right to it shall we...
The first card I want to show you was made with a stamped Bella image, it's Gardenbella. I've been wanting to make a card that's not your normal A2 size card for a while now so here it is. It is actually 5 1/2" x 5 1/2".
The base card is Apricot Appeal that I layered with Old Olive, Summer Sun and Sweet Always DP. The image is colored in with my watercolor crayons. I sponged some Pixie Pink ink around some of the layers. I used my slot punch to punch out a place for the ribbon to go thru. I added some prima flowers and a couple of brads to the front. I also used some stickles on the flower basket and I was complete.
The next set of cards I made was with a stamp that Joyce bought while she was here. It is a Hero Arts image that reminds me so much of SU! Upsy Daisy stamp set. I know, it does not look all to much like it, but it reminds me of it.

The base card is Pink Pirouette that I layered with Pixie Pink and Parisian Summer DP. I ran the Pixie Pink cs thru the cuttlebug with the Stylized Flowers folder. I had taken the Parisian Summer DP and used my Martha Stewart punch along the bottom edge and ran a length of ribbon at the top of it before adhering to the paper. The image was stamped with Positively Pink ink on to white cs then I used my SU! Scallop die to cut it out and trimmed it up to fit the card. I used my sakura gel pen on the butterfly trail and I was complete.

I hope that these two cards hold you for today. I might be back later with a digi page.

Have a great day!

Monday, February 09, 2009

Good Morning and Happy Monday Ü

So how was your weekend? GREAT I hope!!!
Saturday found me up to my elbows in cleaning. Something got into me and I was on a cleaning spree again. Down to the baseboards!! I felt like I couldn't stop. Of course everyone else was doing their own thing. By their own thing I mean watching TV or napping. But that was fine, I was in my own little world and got quite a bit done.
Then yesterday it was out to my SIL's again to play lumberjack. Hubby knocked down a huge tree a couple weeks back and we had the main part of the tree left to split. Thank heavens we were using a log splitter, or it would of never been done. Of course we were not anticipating the weather to be as gorgeous as it was! I went out there with my long john shirt and sweatshirt and hubby had on a thermal shirt. It did not take long to shed the layers I'll tell you. It was a beautiful day!! Now today looks so gloomy out, what a bummer. I can't wait for spring!!!
Wanna see some cards? Yes, I did get a couple of things made this weekend. Not much, but a couple.I'm in need of birthday cards. I used to keep a box with all types of cards in it for whatever might pop up. Well, I need to re-stock it.
This card is made with the Sweet Treats SU! set. Another oldie but goodie! The base card is Pixie Pink. I took my border embossing folders and ran the card thru the CB to emboss just the edge of the card. I then layered the card with DP from Berry Bliss and Petals & Paisley on to a piece of Pink Pirouette and a length of ribbon. I stamped the image and colored it with pencils and gamsol, rounded the corners and layered that on to a piece of Pink Pirouette-rounded those corners and adhered it to the card. For the sentiment in the corner I took my designer label punch to a piece of the Petals and Paisley DP, and inked the edges with Pink Passion ink. I stamped the sentiment from Hero Arts and punched it out with my word window punch and attached it to the card.
For the inside I once again took the CB border embossing folder and embossed the edge of the white cs. I also took a length of the DP and attached it inside and I was complete.

I made another card with the same set Sweet Treats. Here ya go......
Another quick card. I took the border embossing folder and embossed the bottom edge of the front of the card. I took a piece of soft sky and used the scallop border punch and layered that to a piece of yellow cs and added a length of ribbon around it. I stamped the image and used pencils and gamsol to color it in, inked the edges with Pink Passion ink and layered that on to a piece of Soft Sky and adhered it to the card. I stamped the sentiment "Sending you a" from Art Impressions with Pink Passion ink.

The bottom of the picture shows what the inside looks like. I took a piece of the Soft Sky, used the scallop border punch and adhered that to a piece of white cs with a piece of polka dot ribbon to cover the seam. I stamped the sentiment from Hero Arts in Pink Passion ink and I was done!

Last Wednesday there was a tutorial on SCS. It was on a crimped envelope card. Well, I don't own a crimper, so this is my version. TOTALLY easy - ok, easier if you have a crimper.
You just take an A2 size envie and cut the top off. Stamp on the envelope, I used my TAC set Love Blooms. I "crimped" the envelope by just folding it by hand.

For the inside I just took a 1/4 sheet of Riding Hood Red and Pretty in Pink. I sponged some Real Red around the Pretty in Pink, inked up the stamp from TAC's Forever Family and stamped it three times. Once you've got the inside card done take the "lid" that you cut off from the top of the envelope and decorate that as you wish and pop it on the top of the envelope.

It only took me 5 minutes to make this card, yes even with the "hand" crimping. I just wanted to see how it was done - next time I'll take my time and make a nicer card.

Well - that's all for today. I hope to have more to show you tomorrow!!

Have a great day!!
Hugs,

Joani

Wednesday, October 22, 2008

Good Morning!

Good morning everyone! I hope that today finds you well. It is a cool, crisp fall morning here. It is actually a little nippy out. I'm thinking a great sweatshirt kind of day! I just love fall!!


I have not finished my project that I was working on yesterday, but I did make a couple of cards that I can show you. As you know there is a lady that my husband works with that lets me put some of my creations at her booth at the Peddler's Mall. Well, I thought that I'd make some Christmas cards for her as a 'thank you' for allowing me to use space in her booth.

I'm kinda a non traditional Christmas color person. Don't get me wrong, I love Christmas! But since the stores commercialize it so by putting items out months before they should I get kind of tired of red and green. That's why you'll see lots of other colors from me for the holiday season.

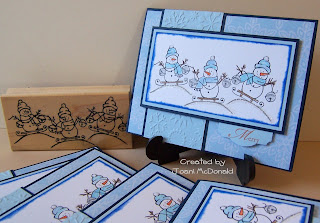
The image stamp is from Great Impressions. The cs colors are Soft Sky (I loaded up on this before it was gone), dark linen blue and silver. I stamped the image with my black ink and colored it in with pens and pencils. I also used my sakura gel pen. The background snowflakes were stamped with my metallic silver pad. I just layered the image on to the different cs and that was all. The sentiment is from Hero Arts.

Once again the image is from Great Impressions. I've had these stamps quite some time. I purchased them from the local stamp store in California that I used to frequent (oh how I miss that place!!!). They would have these stamp of the month stamps, and of course I had to always be there to purchase them!!

The colors are the same. I stamped the image and colored it in with my pencils and gamsol. Once I colored the image I sponged Brilliant Blue ink around the panel. The background paper is from a paper pack I purchased last year at Walmart. I layered the dark linen blue and Soft Sky paper. I also had some paper that was run thru the cuttlebug in the Soft Sky color that I attached to the card. For the sentiment I stamped the word 'happy' in silver metallic on a piece of Soft Sky that I punched with my tab and attached that under the image panel.

I really hope that she likes the cards that I made for her. It's just a small gesture to thank her for her kindness.

Well ~ I must be off. I've got to finish the project that I started working on yesterday with Betty and Mom. I will show you pictures tomorrow for sure!

Have a great fall day!
Hugs,
Joani

Wednesday, July 30, 2008

This is what I've been up to, again!

Just a couple of creations for today! I wanted to make a couple of thank you cards and now with my clear $1.00 stamps hanging on my hillbilly hanger I thought that I'd use them.

The base cards are Pixie Pink. I layered them with some paper that my friend Betty ran thru her Cuttlebug for me. I then used a crayon that I ran over the embossed paper to give it a little more color. I added a length of ribbon and that was the base of the card.


I took my Giga scallop circle punch and punched out the larger circle ~ then the Mega scallop punch to punch out the smaller circle in a different shade. I stamped the images from Studio G (woo-hoo to my Michael's for finally getting those in!!) in Pink Passion ink. I layered that image on top of the scallop circles. Then the bottom corner looked a little plain.


I took my designer label punch, my 1 1/4" circle punch and my word window punch to make the layers for the bottom saying. I stamped the saying 'very much' in Pink Passion ink. The saying is from Hero Arts. I added a couple of brads and taped it to the corner. Quick and easy.


This card took me a few days. You know why? Well it was "Mom" this and "honey" that. I finally sat down and finished it ~ and I was happy with the outcome. I used the TAC set A Bit of Camping and the SU! set Lovely as a Tree for this card.

The base card is Creamy Caramel. I took Close to Cocoa ink and stamped the sleeping bag all over the card. I layered Handsome Hunter and some DP from TAC's Kamalaht collection and layered it to the card. I added a couple of eyelets on the bottom piece.


For the main images I stamped the tent, fishing pole & fire with the TAC set. Since I do not have any trees from TAC yet I had to use SU's Lovely as a Tree set. I masked off the tent and fire and stamped those images. When everything was colored I then used a stipple brush to apply ink to the sky and ground. I was pretty happy with how it turned out.


Now, I'm off to do some blog hopping! Have a great day!!
Hugs,
Joani

Wednesday, January 30, 2008

Pucker up, Baby!

Pucker up, Baby!
This is a card that I made for my MSN group Cards Made by Hand. We are having a mouse swap and what better images to use than House Mouse. I did at one time have MANY of their images, but I got rid of them all ~ to someone who I know will take very good care of them!

The base of this card is Pixie Pink. I then layered that darn polka dot paper to it. I really wish that I could remember who makes that. Years ago I went to a stamp show and loaded up on this and the brass stencils, but for the life of me I can not remember I purchased it from!!!

Anyway, I then cut the scallop edge on a piece of Pretty in Pink with a (huge) pair of scissors I have. Yes, it's killin' me that the scallop is crooked (it's the OCD in me!). I then used my Crop-a-dile to dry emboss the circles inside the scallops. Whoever came up with that idea is simply a genius!! I stamped the word sweetness (from Hero Arts) on that piece in Pink Passion ink and sponged it on the scallops. Maybe if I didn't sponge the scallops it would not show that they are crooked? Can you tell that this is bothering me???

I stamped the image and colored it with pencils. Then I layered that to a piece of Pink Passion cs before I added the glitter.

I added a length of ribbon (from Walmart) over than and then attached it to the card. I made the photo corners, hand drew the "stitching" and stuck them to the back of the image. After adding the photo corners I placed the panel on the card with pop dots and "poof" ~ all done!

Tuesday, December 18, 2007

Happy New Year!

Just getting past Christmas, not far past ~ but past it to say the least.

I was thinking of something that would make me think of New Years. Well, I did not have a chamagne bottle so wine will have to do... The wine bottle and glass stamp is from Ann-ticipations and the saying is from Hero Arts.

I stamped the bottle and glass in black ink and colored it in with pencils and gamsol. I guess by now you all know that I love gamsol and pencils. I think it's my favorite method of coloring...

Anyway, I sponged Brilliant Blue around the edges and I layered that on to silver CS. Then I layered that on to dark blue linen that I had got from my LSS in California.

For the saying I used my Stamp-a-ma-jig and broke the words apart so they would fit. I stamped them with Brocade Blue and sponged Brilliant Blue around that panel as well. I layered them as I did the image panel.

I used a peice of BG paper that I got from a stack at Walmart to layer the panels on. I used my corner punch from All Night Media on that and layred that on to the same dark blue CS as on the panel.

I hope you like the change from Christmas to New Year's!!! Let me know.

Tuesday, November 27, 2007

For Gabby's Challenge-My Blue Christmas

Once again I am plugging my girl Gabby's blog, Confessions of a Stamper. She is having a blog candy challenge (which I hope to have soon???-depending on all of you). She is just asking that you follow her guidelines.
I must appologize, but my sorting of paper is in a transition right now. I do know that the CS is SU! however, most of the colors are just in drawers not sorted. But otherwise, here is the recipie:
SU! Bashful Blue and Chocolate Chip.
Paper Salon polka dots & Walmart Chunky stack BG paper.
Ornaments by Great Impressions, stamped in black and colored with pencils and Gamsol.
Christmas Greetings by Hero Arts.
1 3/8" 1 1/4" 1" Circle punches.
34 guage wire.


I hope you enjoy!! Thanks for looking