


I hope that today finds you well, and that your weekend was a great one. Father's day was a nice quiet one here. Well, quiet for the most part. It's been hot outside so we decided to give Dixie a bath out back. An hour later and a couple of sunburns and she still had soap left on her. The wacky dog! She loves it outside when it's raining but when it comes to bath time she hates it. Oh well ~ enough of that, you stopped in for the tutorial so here it goes.

Here's what I gathered to make the easel box. And if you need to just click on the picture and it will bring it up larger for you to view ~ then just hit your back button to be brought back to here. Ready, here goes...

You will take a 6" x 9" piece of card stock and score the 6" side at 1" and 5".

Then turn your paper to the 9" side and score at 4" and 5".
You will snip the center flaps up to the 1" line. I like to cut out a little of the flap on my corners and flaps when I make boxes. It helps when your are putting boxes together. Now set this aside for now.

You will now take a coordinating piece of card stock (I used Ballet Blue for this box) and cut it at 7 7/8" x 7 7/8" and score all 4 sides at 1" and 2".

Now you will cut out the "L" shape from each corner. Then notch the 4 corner flaps like in the picture below ~ similar to what you did on the last piece.

This is the hard part for me to explain so I have a couple pictures to show you. Pre-fold all the score lines first. Then you will add adhesive to the outer flaps. Take the small flaps and tuck them in and fold them between the outer and inner wall folds.

This is what the drawer will look like when the flaps are tucked in and the outer flap is glued down.
Now repeat with the other sides, you just wont have flaps to sandwich together.

Now we will work on the easel part. You will cut a piece of card stock at 4" x 8". Score the 8" side at 2" and 4".

You will take another coordinating piece of card stock and cut it at 4" square. Decorate your 4" square piece and the bottom 4" of your easel card that we just cut.

Now add your 4" square piece that will be your top and add it to the 2" score piece of the easel. Remember to apply adhesive to the 2" square only.

After decorating your piece and adding it to the easel it is time to adhere it to the box top. Take the 6" x 9" piece that we first worked with and we are going to adhere it to the base. I found it a lot easier to add it to the box top before gluing the box together, you don't "mash" the box this way. Add your adhesive to the 4" underside of the easel and attach it to the box top.

Now you will put your box together so the drawer can fit into it. Apply adhesive to each top inside flap. The little short flaps will be sandwiched in between the two longer flaps. I did it this way so the drawer can move in and out of the box freely and not be hung up on the short flaps.
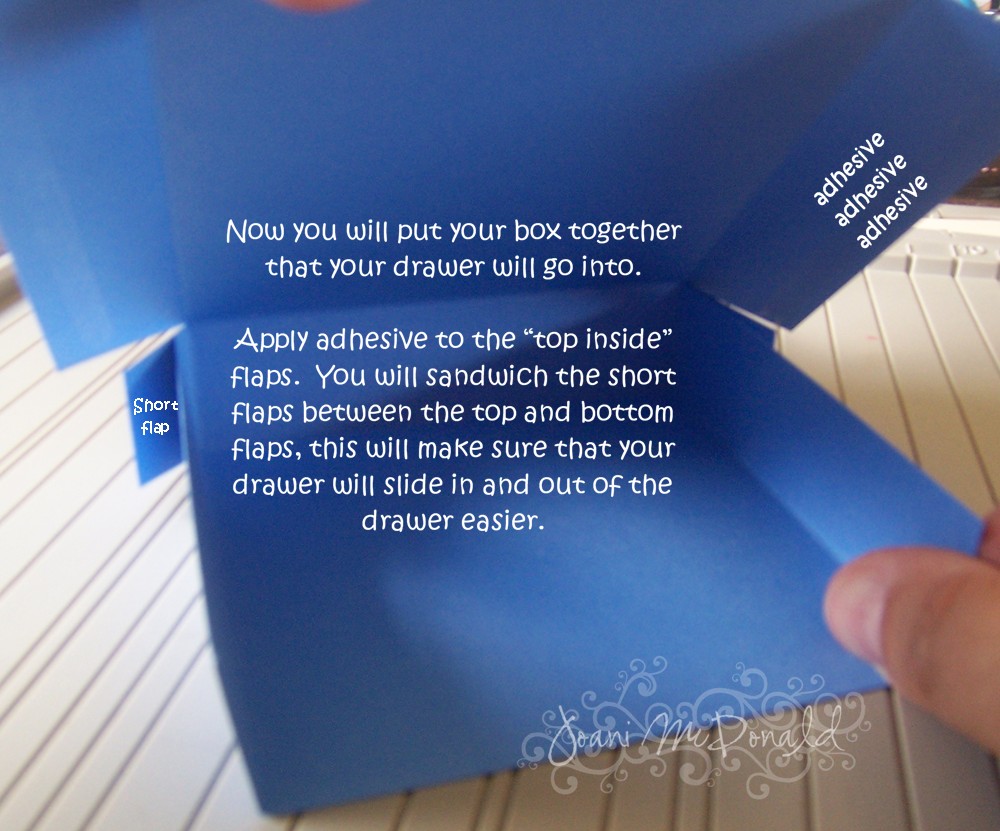
Here is another view of the 'sandwich' on how the flaps are.

All you have to do now is put the drawer in and you should be complete.

Here is a picture of the box with the easel down and the drawer closed. It is perfect to add some 3" x 3" note cards in or some cute embellishments. The possibilities are endless...

I'd love to see what you came up with. Post a comment and add a link and I'll stop by and take a peek. If you have any questions just be sure and ask and I'll get back to you as soon as I can.
Have a super great day!!





