Don't miss out on these other pages!

Class Schedule

(502) 370-7632 Joani

Please call or email us to reserve your spot.

Showing posts with label Tutorial. Show all posts

Tuesday, June 02, 2015

Die Match Up

Good Afternoon blogging friends!  I hope today finds you well.  It is a gloomy, gloomy day here.  Kind of drizzly.  But I'm not going to complain ~ I'm inside and it is not HOT out :)

I wanted to show you all something that I did to help me a little better with my card making.  Now you all know that I love my Stampin' Up! stuff.  I love how they have the cutting dies to match their stamps!  Well this past weekend at our card class I made a card that called for the stamp set Flower Patch (134207 clear) and the matching Flower Fair Framelits Dies (133731).  Being the kind person that I am ;) I have everyone do their own stamping and I cut the pieces out for them.  Now we did not have many in the class, but there were a few pieces to cut for each person.  I'm not sure if you've ever run into the problem of using a die when you stamp something that is not of a uniform shape or not, but it can be a real pain. 

Everyone stamped their images and there were actually 7 pieces each to cut, which was fine because I could cut more than one at a time.  But there were 2 flowers that were giving me trouble.  So when I came home I marked the die and the stamp so I would not have that problem again.
If you can see in the picture I marked the dot on the back side of the stamp and the spot on the die where the stamp matches to.  Once you stamp your image off before lifting the stamp mark the paper with a dot so you know where to place the die.  Easy peasy!!  Trust me, I've used this stamp quite a bit now and it was always frustrating to me when I went to cut it out.  I had to have an "ahhh ha" moment to realize that there had to be an easier way.
 
Now I'm not to sure how you would do it with an actual wood mount stamp.  Maybe put a dot on the wood at the place where the die would go? 
  
This has worked for me, and I think that it will not be the cause of any more grey hair that pops out.  I hope that it works for you.  If you have any questions just leave me a comment and I'll answer them the best way I can.  Oh and yes, that was one of the cards we made in this past weekend class.
 
 Thanks for stopping by today!  See you soon!!
 
EDITED TO ADD:
As always, if you can not see the picture well then just click on it to bring it up larger.  To clear out of it just hit the X in the top right corner to bring you back to here.


Monday, January 17, 2011

Corsage Box Tutorial


Ok everyone, I've got the tutorial for the corsage box posted on my Stampin' Up! blog if you want to take a peek ~ it can be found if you click on the picture or HERE.  At anytime it is listed up top of my blog under the TUTORIALS tab.  Have a great day everyone!

Tuesday, September 07, 2010

Your Wagon dimensions

Hi Everyone ~ I hope that today finds you well after the weekend!  It was nice to have a long weekend to spend with family AND have the weather on our side.  It was so beautiful this past weekend, and today is going to be hot.  Ugh...

I had been asked by a few if I could share the dimensions for the wagon that I made so I want to post those.  it was extremely easy.  If you've made anything before this is just your basic box.  But, if any of you want a tutorial please just ask and I'll work one up...  So here goes...

You will take a piece of card stock, preferably red, that is 4" x 5" and score it at 1" on all 4 sides.  Cut at the corners up to the 1" score line and assemble the box together.  For the handle I took a piece of black card stock that was 1/2" wide to form a "T".  I actually started it under the wagon about a 1/2" and taped it up the front of the box.  The wheels are 1" black circles and 1/2" white circles.  I added an eyelet to the center and adhered them to the box.  For the back of the wagon I used my Modern Label punch that I punched out a piece of black card stock and added from scraps to form the "license plate".

If you have any questions, please just ask.  If you'd like an actual picture tutorial let me know and I can work one up.

I'm not sure if I will be posting tomorrow or not ~ it's my special day...  And yes, I'm getting old...  Having a teenager who reminds you does not help.  So if I'm not here I will be back Thursday!

Have a super great day!

Friday, August 20, 2010

Desk Tidy Tutorial

Are you ready for a tutorial on the desk tidy?  Well, here goes ~ and remember if you need to see something up close a little better just click on the picture and it will bring it up larger for you, then hit your back button to get back here Ü
You can make the base of this desk tidy with one sheet of 8 1/2" x 11" card stock and a few scraps of designer paper. 
The first piece is cut 3 1/4" x 10" and you will score it at 1", 2", 3" and 6 1/2".
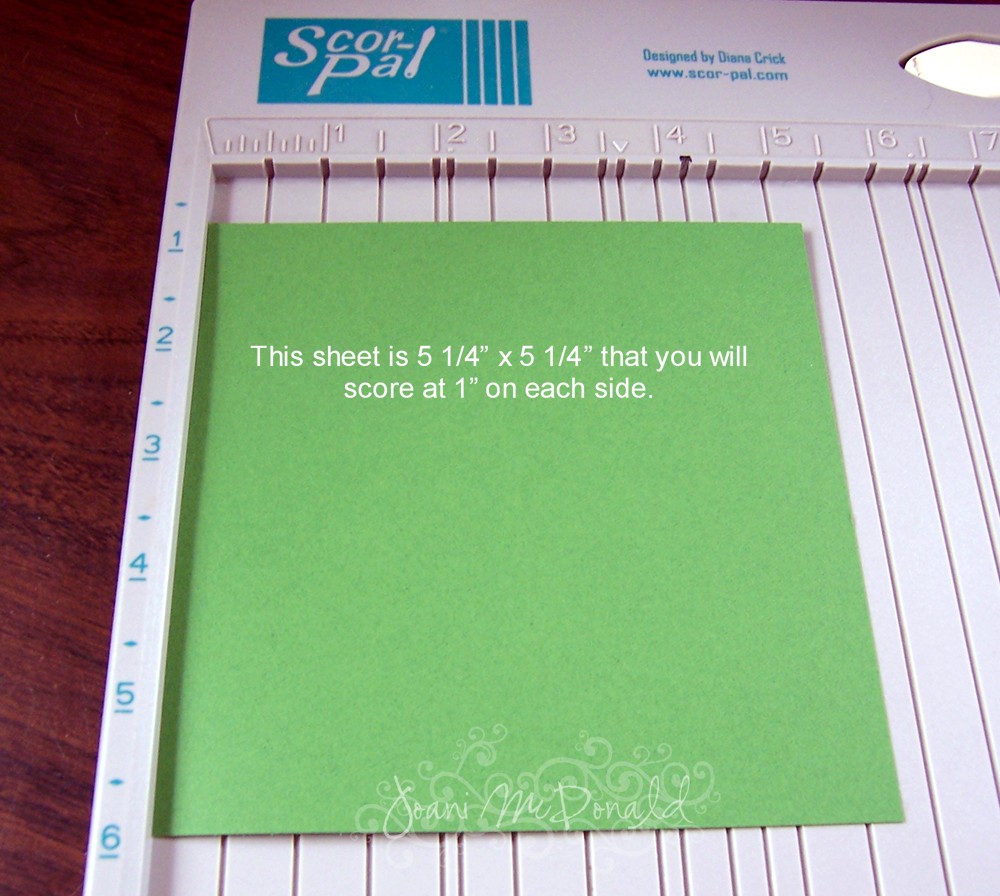
This piece of card stock is cut at 5 1/4" x 5 1/4" and you will score at 1" on each side.
Cut each of the 4 side "flaps" up to the 1" score mark.  If you've seen my tutorials before you know that I like to cut a little notch out of each flap so when you adhere the box together you will see that it is a little "cleaner" looking. 
To cut the notch out make a mark in the center of your piece so you can center your cut out.  I took my 1 1/4" circle punch and inserted it half way in to cut out the notch.  This will be the front of your tray, then fold it up to complete the tray.
This piece will be the back part of the disk tidy.  It is cut at 2 1/2" x 4 1/4" and the scoring is a little tricky.  In this position you will score the paper at the 1" mark and then rotate the paper 180 degrees and score it again at 1".  Then on the short ends you will score at 1/2" in on both sides.
 
This picture shows the scores a little clearer.  And remember to cut out your notches.  Now assemble your box together.
Now we will take the 3 1/4" x 10" piece and adhere it to the tray.  You will take the long flap and apply take to the back bottom and adhere it INSIDE the back of the tray.  You will then take the 1" scored piece and apply tape to it to adhere to the BACK outside of your tray.
**NOTE:  I forgot to take a picture of how you will fold this piece after it's scored, sorry.  But I think that by looking at this picture you will be able to understand it.  If not, please shoot me an email or leave me a message and I'll try to explain better...
It is important that you try to use a strong adhesive to piece your box together ~ you can even use your favorite 'wet' glue.  One of my favorites is Zip Dry paper glue.
When I'm putting this together I pick the piece up and scrunch it together.  It just works easier for me, you may have an easier way for you.
Now you will take the 2 1/2" x 4 1/4" piece and apply adhesive to the back side and adhere it to the BACK of your desk tidy.
It should look something like this when the pieces are all put together.  It really goes fast, and it really is easy to make.  All you have to do is decorate it and fill it and you are complete.
The base of mine is Garden Green and So Saffron and Petal Patch DP.  The image is actually a digi stamp from Cuddly Buddy
I hope that this tutorial helps you out.  If you ever have any questions, just feel free to ask!
I'd love to see what you came up with ~ if you try it send me a link, I'd love to see it. 

Have a super great day!

Wednesday, July 21, 2010

T Slide Tutorial

T slide, T shape...  Which is it?  I really don't know but you get what I mean.  Are you ready for my tutorial?  I hope so because here it goes...  AND REMEMBER, you can click on any picture to make it larger to view ~ just hit your back button to come back Ü
Here's a sample of what you will need, I kinda added and subtracted as I went.  But here is a list:
  • 5 1/4" square of card stock (card base)
  • 5" square of 2 sided (prefered) designer paper (card front)
  • 3 1/2" x 1 1/4" piece of card stock (for inside sentiment)
  • 4" x 1" strip of card stock (for slide mechanism)
  • 4 1/2" x 1" strip of card stock (for slide mechanism)
  • 1" (or 1 1/4") circle punch
  • Stamps, ink, embellies, cutting mat, metal ruler and scrap DP and card stock
You will take your 5" square piece of DP and flip it over to the "wrong" side and make your pencil lines.  Make pencil lines 3/4" inch in on each side.
Now you will make a cut on 3 sides along the lines and a score along the last line.  You will also take the center piece and measure 1 1/2" in and score, then again and that should leave you with a 1/2" score at the end.
On the end with the 1/2" score mark approx. 1/2" in from there and make 2 parallel lines approx. 1 3/8" in length and cut to make a place for your hidden message to come out of.  I like to use my metal ruler to make the cuts ~ it insures that you make a straight line.
Now your paper should look like this.  You will have 3 cut sides and one scored side.  You will have your 2 score lines 1 1/2" from each other on the flap and one that is 1/2".  You will also have the notch cut out where your slider message will pop out.  And remember, this is all on the "wrong" side - the other side will be the card front.
Now turn the paper 180 degrees so the score line is on the left.  Take your 3 1/2" x 1 1/4" strip of paper and score 1/2" on one end.  You will add adheside to the 1/2" end and adhere it down to the edge of the scored side of your 5" square peice.  (Did I explain that right?  Sometimes I know what I want to say and it does not come out that way...)  Then tuck the other end in the slot that you made.
I love making these cards, they are fun.  It's kinda cool to watch when you give people a card you've made and they can "play" with it.  Some people are amazed that you've made something like this...  It puts a smile on my face to watch them.

So now you will take the 4 1/2" x 1" card stock strip and insert it thru the hole of your 1" circle punch and round off the edge.  If you want to add a piece of matching DP cut it at 4 1/2" x 3/4" and repeat the same process to get the matching rounded edge.
Then tape the two together.  This will make it so you don't have to add a tab to the end that you pull.  I find that when you add a tab or circle on the end it hangs up when you try to close the card.  With this there are no pieces to get caught when you close the card.  If you've made the card the way that the tutorial asks you will notice the difference.
Now add the piece we just rounded to the 4" x 1" piece as shown.
Still working on the "wrong side" you will attach tape to the 1/2" scored piece on the flap as shown.  Take your T Slide piece and adhere it down.
Ok, if your still with me, you are almost done ~ really.  This is how your card should be looking like now.  You have your message slider (the green piece) under the T slide mechanism.  Now take your tape and apply it to the outer edges of the card front.  Make sure that you dont apply tape to any area too close to where the T side will go.  Once that is done you will flip it over.
This is where you will adhere it to the 5 1/4" square piece of cardstock.  BUT, before you do so if you'd like another piece of DP to coordinate you would need to add it to the 5 1/4" square piece before you add your card front that we just worked on.  I did not in this tutorial, I just used stamps, but the other cards I did I cut a piece of DP 4" square.

This is also when I add the sentiment to the inside slider instead of at the beginning.  This way I can make sure that it is hidden in case I goofed on a score or measurement.
Now is when you can begin to decorate your card.  If you add a panel to the front make sure that you only adhere it to the far right side 1 1/2" scored area or the card will not open properly.  The panel can be bigger than that area, just make sure that the tape is not applied any place else.
This is my finished card.  The base card is Cherry Cobbler that I layered with Gable Green and DP from Creative Imaginations called Iron Orchid Designs.  The image is from Darcie's that I colored with my pencils and gamsol.  I stamped the swirls from The Angel Company called Butterfly Swirls. 
The sentiment inside is also from The Angel Company, it was their gift with purchase stamps.  I stamped that with Real Red ink and punched it out with my Marvy super jumbo scallop oval punch.
I wanted to add some ribbon to dress it up a bit so I added some ruffles with my red grosgrain ribbon the edge.  As an after thought I put the button on the pull tab and just added a piece of ribbon thru the holes. 

I hope that you enjoyed this tutorial, and if you have any questions don't hesitate to ask.

Monday, June 21, 2010

Easel Box Tutorial

I hope that today finds you well, and that your weekend was a great one.  Father's day was a nice quiet one here.  Well, quiet for the most part.  It's been hot outside so we decided to give Dixie a bath out back.  An hour later and a couple of sunburns and she still had soap left on her.  The wacky dog!  She loves it outside when it's raining but when it comes to bath time she hates it.  Oh well ~ enough of that, you stopped in for the tutorial so here it goes.
Here's what I gathered to make the easel box.  And if you need to just click on the picture and it will bring it up larger for you to view ~ then just hit your back button to be brought back to here.  Ready, here goes...
You will take a 6" x 9" piece of card stock and score the 6" side at 1" and 5".
Then turn your paper to the 9" side and score at 4" and 5".
You will snip the center flaps up to the 1" line.  I like to cut out a little of the flap on my corners and flaps when I make boxes.  It helps when your are putting boxes together.  Now set this aside for now.
You will now take a coordinating piece of card stock (I used Ballet Blue for this box) and cut it at 7 7/8" x 7 7/8" and score all 4 sides at 1" and 2".
Now you will cut out the "L" shape from each corner.  Then notch the 4 corner flaps like in the picture below ~ similar to what you did on the last piece.
This is the hard part for me to explain so I have a couple pictures to show you.  Pre-fold all the score lines first.  Then you will add adhesive to the outer flaps.  Take the small flaps and tuck them in and fold them between the outer and inner wall folds.
This is what the drawer will look like when the flaps are tucked in and the outer flap is glued down.
Now repeat with the other sides, you just wont have flaps to sandwich together.
Now we will work on the easel part.  You will cut a piece of card stock at 4" x 8".  Score the 8" side at 2" and 4".
You will take another coordinating piece of card stock and cut it at 4" square.  Decorate your 4" square piece and the bottom 4" of your easel card that we just cut. 
Now add your 4" square piece that will be your top and add it to the 2" score piece of the easel.  Remember to apply adhesive to the 2" square only.
After decorating your piece and adding it to the easel it is time to adhere it to the box top. Take the 6" x 9" piece that we first worked with and we are going to adhere it to the base.  I found it a lot easier to add it to the box top before gluing the box together, you don't "mash" the box this way.  Add your adhesive to the 4" underside of the easel and attach it to the box top.
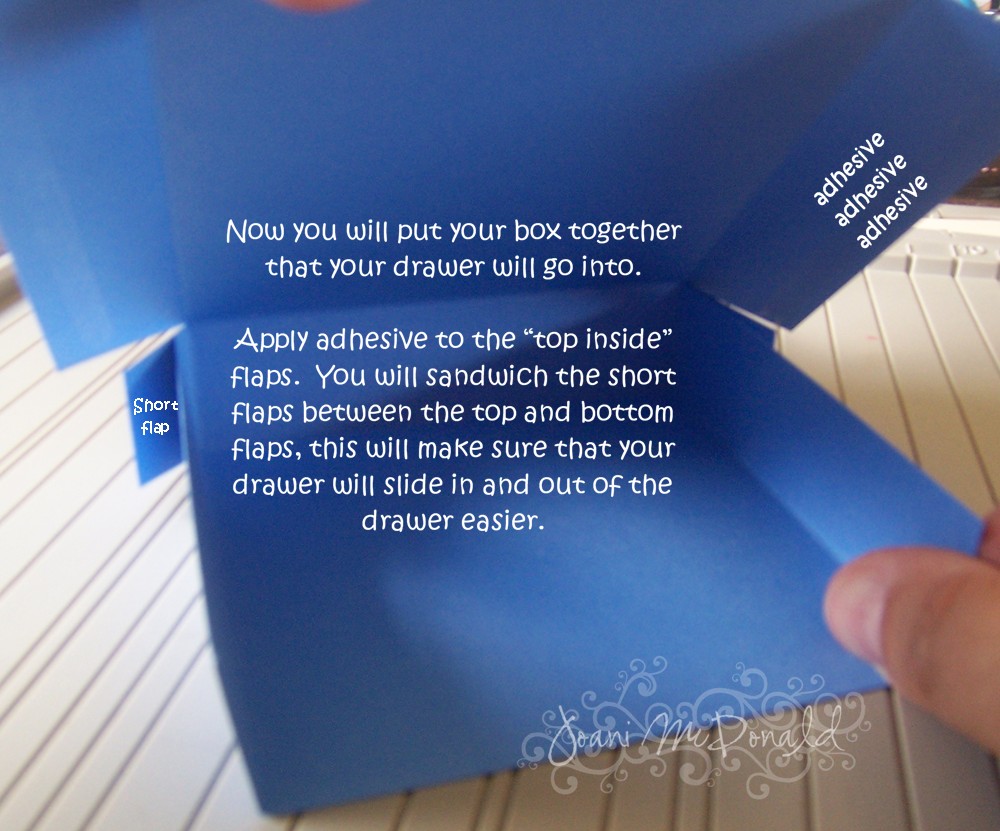
Now you will put your box together so the drawer can fit into it.  Apply adhesive to each top inside flap.  The little short flaps will be sandwiched in between the two longer flaps.  I did it this way so the drawer can move in and out of the box freely and not be hung up on the short flaps. 
Here is another view of the 'sandwich' on how the flaps are.
All you have to do now is put the drawer in and you should be complete.
Here is a picture of the box with the easel down and the drawer closed.  It is perfect to add some 3" x 3" note cards in or some cute embellishments.  The possibilities are endless...
I'd love to see what you came up with.  Post a comment and add a link and I'll stop by and take a peek.  If you have any questions just be sure and ask and I'll get back to you as soon as I can.

Have a super great day!!

Tuesday, March 30, 2010

Bunny Box Tutorial

Here it is, the bunny box tutorial ~ and in time to make these for Easter!!   This is a LONG post so stay with me ~ I hope that you enjoy!! 

And remember you can click on any picture to make it larger.  Just hit the back button to get back here.
Here is what you will need:
1 - 8 1/2" x 4 1/4" piece of Chocolate Chip cs
2 Top Note dies
1 - 8 1/2" x 1/2" strip of Chocolate Chip cs
4 wide oval punches in Chocolate Chip
2 small oval punches in Chocolate Chip
2 - 1 3/8" circle punches in Chocolate Chip
2 - 3/4" circle punches in Black
1 -1" circle punch in Chocolate Chip
2 - 1" circle punches in White
2 small oval punches in Pink
2 - 3/4" circle punches in Pink
2 - 1/2" circle punches in Pink
4 - 1/4" circle punches in Pink
1 word window punch in White
1 small heart punch in Pink
Close to Cocoa ink
2 small eyelets
Crop-a-dile (or other eyelet setter)
glue pen and zip dry glue
adhesive
cotton ball
white gel pen
The first thing you will do is make your box.  Take your 8 1/2" x 4 1/4" piece of cardstock and score as shown above.  I find it easier to add your adhesive for the top note dies before the box is created.
Crease your box and adhere together.
I goofed and added the back top note die before I added the handle.  No big deal, but it is easier if you add the handle before adding the back and front to the box.  Trust me, I found this out the hard way Ü

Take your strip of paper and punch holes 1/2" from each end.  Then take your box and punch a hole on each side 1/2" from the top.  Add your eyelets, but don't squeeze them too tight so you will have a little "give" and the handle will move freely.  I'm sure that you can use brads but eyelets are a lot more sturdy and your handle will last longer. 

Now you'll want to sponge your Close to Cocoa ink around all your pieces before you adhere them together.  I didn't do the pink parts for the feet but you can - it's up to you.  There are no rules, it's whatever you feel like.
This is what your box should be looking like now with the handle and the back attached. 
Now you will take 1 of the wide Chocolate Chip ovals and 1 small pink oval and attach together.  Then add some adhesive to the bottom corner of the ovals and attach under the top note die.
Take your small oval Chocolate Chip punched piece and attach it to the outer corner of the ear.  Just so it looks a little "floppy".  Do so for both sides.
Now that both the ears are complete you should have something like this.
Let's work on the feet now.  Take your other two wide oval Chocolate Chip pieces and attach to the bottom corners of your top note die.  Have them stick out a little bit. 
You will take your 3/4", 1/2" and 1/4" circle pieces and attach them with your glue pen as shown.  Repeat for both feet.
Now you will take your 1 3/8" brown circles together and cut just a tiny bit off of them.
Just a little bit to make them fit flush together.
Take your word window punch and cut it in half.
This is hard to explain ~ but take your two circles and put them flush together.  Then lift up one side and add the "tooth" under and adhere.
Lift the other side up and adhere the other "tooth".  Make sure that they are straight and flush.  Then adhere your brown circles together - yes, flush.
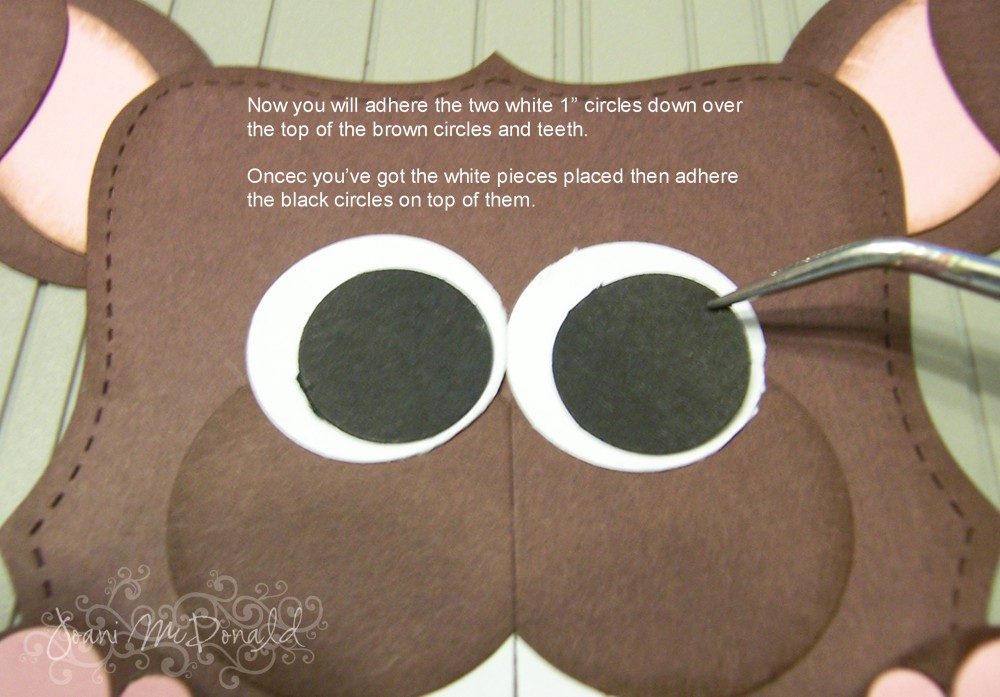
Ok, on to the eyeballs.  Take your two 1" white circles and glue them over the top of the brown circles.  Once you've done that take your two black 3/4" circles and glue them on top of the white ones.
You will now take your 1" brown circle and cut it in half.  Add a pop dot to the back side and attach it to the top of the eyeball - these are your eyelids.  Make sure that you use your white gel pen on the black part of the eye.  You will add the pink ♥ just under the white of the eyes, this is his nose.
Once you have all the pieces attached peel the tape liner off the box and add him to the front.  But wait!! We are not done yet!
Take your zip dry paper glue (or any other type of wet glue that you like) and add a big glop to the back side of the box.  We still need to attach his tail!
Once the tail is attached set it aside to dry, and we are done!!

I'd love to see what you came up with.  Leave me a comment with the link and I'll check it out!  I told you it was a long post!

Have a great day!