Don't miss out on these other pages!

Class Schedule

(502) 370-7632 Joani

Please call or email us to reserve your spot.

Showing posts with label digi stamps. Show all posts

Thursday, November 11, 2010

I told you I'd be here ~ here I am!

I told you I'd be here with something to post and I am ~ and so early.  Well, early for me anyway!  Are you ready for some Fall cards?  That's what I've got to show you.  This year I've made a few cards for some of Danielle's old teachers who used to buy cards from me and I want to share them with you.  I won't bore you with any chit chat today, just all business Ü

Now you might need a double take on these first two cards - no they are not identical, they are just alike.
The base card is Kraft that I layered with some DP from my Provocraft Americana Patchwork collection.  The image is a digi image from Karen's Doodles that I printed and colored in with my pencils and gamsol.  I used markers here and there for little touches.  I cut the image out with my oval nestie and then cut out a scallop oval nestie to layer behind the image.  Before I placed the image panel down I took a piece of scrap Kraft card stock and added a length of ribbon to it and added it to the center of the paper.  Once the image panel was added I picked out some primas and some eyelet/brads and added them with glue dots around the panel.  Once everything was in place I added some stickles for a little glitter here and there and I was complete.  The next card is basically the same with just a different image from Karen's Doodles. 
This image was also printed and colored with pencils and gamsol.  I generally print the image out then hit it with the heat gun for a minute to make sure that the printer ink does not get all muttled up when using the gamsol.  I've not had any trouble with the images that way.
Some of you who've been follower's for who have come to my blog for a while may remember this image.  I've had this stamp for years and years - it is probably one of the first stamps I purchased.  It is an image from D.O.T.S. (yes, it's that old!) who is now called Close To My Heart.  I just love this image, it's very "Fall-y".  The base card is Real Red that I layered with Creamy Caramel and some DP from Paper Pizzaz. If you notice that the orange layer kind of looks a little like wood grain?  That paper did not have a maker on it ~ but I sponged some Close to Cocoa ink around that layer before adding it to the card. 

I stamped the image and colored it with my pencils and gamsol then cut the image out and adhered it with pop dots to the card.  I had a couple of the Chocolate Chip swirls on my desk left over from another project and I added those to the corners for a little fun. 

I hope that you enjoyed these cards today, and that they inspire you to create something Fall-like.  As I look out the window today I see all the Fall colors and it's so pretty.  Even though I'm a little busy I just might take the pooch for a walk, it's a beautiful day!  Not too long before the cold Winter will be upon us.

Have a super great day! 

Saturday, October 23, 2010

A little Bugaboo for you...

Good afternoon all my blogging friends!  I'm taking a break from the beautiful day to share with you a card that I made yesterday.  I've been a little hooked lately by the digi stamp bug - and I needed to make another special card for Halloween and this is what I came up with.
I was out and about in blog land and stopped in to Bugaboo Stamps and found this cutie!  She is part of their Halloween brats set.  She reminds me of a much younger me (he he he...).  I made the card 5 1/2" x 5 1/2" square.  The base card is Tangerine Tango that I layered with Green Galore and Almost Amethyst.  The DP is from My Minds Eye and SU!  I printed out the image and heat set it with my heat gun then colored the image in with my pencils and gamsol.  I used my picket fence punch from Martha Stewart nesties to create the base behind the image.  I then wanted something in the bottom corner so I cut out the flourish with my Storybook cartridge and glued that in the bottom right corner.  I stamped the leaves and pumpkin out from SU! Happy Fall Ya'll set, colored them with pencils and gamsol and adhered them over the flourish.  I added a little stitching with my Pumpkin Pie marker around the image panel then gave it a spritz of shimmer with my Shimmer Mist and I was done.
You can kind of see the shimmer a little in this picture...

So that's all I've got for you today.  Hope to see you back here Monday for more.  Who knows what it will be Ü  Have a super great weekend!

Friday, August 20, 2010

Desk Tidy Tutorial

Are you ready for a tutorial on the desk tidy?  Well, here goes ~ and remember if you need to see something up close a little better just click on the picture and it will bring it up larger for you, then hit your back button to get back here Ü
You can make the base of this desk tidy with one sheet of 8 1/2" x 11" card stock and a few scraps of designer paper. 
The first piece is cut 3 1/4" x 10" and you will score it at 1", 2", 3" and 6 1/2".
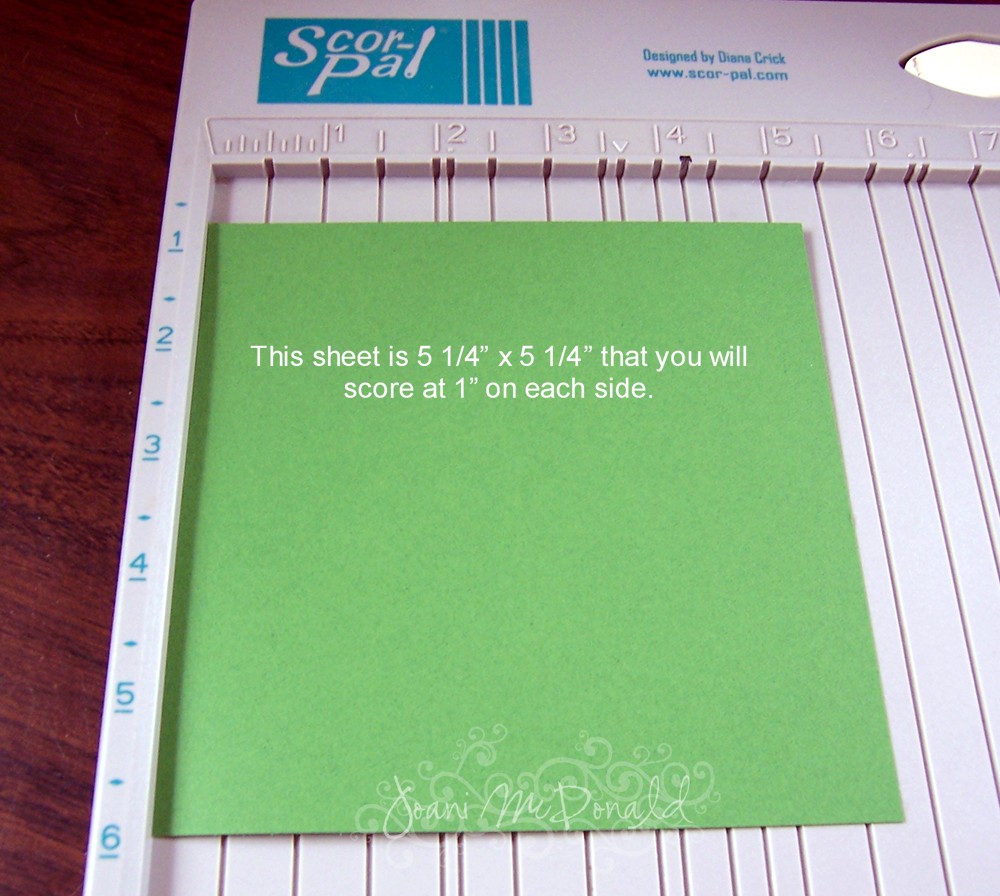
This piece of card stock is cut at 5 1/4" x 5 1/4" and you will score at 1" on each side.
Cut each of the 4 side "flaps" up to the 1" score mark.  If you've seen my tutorials before you know that I like to cut a little notch out of each flap so when you adhere the box together you will see that it is a little "cleaner" looking. 
To cut the notch out make a mark in the center of your piece so you can center your cut out.  I took my 1 1/4" circle punch and inserted it half way in to cut out the notch.  This will be the front of your tray, then fold it up to complete the tray.
This piece will be the back part of the disk tidy.  It is cut at 2 1/2" x 4 1/4" and the scoring is a little tricky.  In this position you will score the paper at the 1" mark and then rotate the paper 180 degrees and score it again at 1".  Then on the short ends you will score at 1/2" in on both sides.
 
This picture shows the scores a little clearer.  And remember to cut out your notches.  Now assemble your box together.
Now we will take the 3 1/4" x 10" piece and adhere it to the tray.  You will take the long flap and apply take to the back bottom and adhere it INSIDE the back of the tray.  You will then take the 1" scored piece and apply tape to it to adhere to the BACK outside of your tray.
**NOTE:  I forgot to take a picture of how you will fold this piece after it's scored, sorry.  But I think that by looking at this picture you will be able to understand it.  If not, please shoot me an email or leave me a message and I'll try to explain better...
It is important that you try to use a strong adhesive to piece your box together ~ you can even use your favorite 'wet' glue.  One of my favorites is Zip Dry paper glue.
When I'm putting this together I pick the piece up and scrunch it together.  It just works easier for me, you may have an easier way for you.
Now you will take the 2 1/2" x 4 1/4" piece and apply adhesive to the back side and adhere it to the BACK of your desk tidy.
It should look something like this when the pieces are all put together.  It really goes fast, and it really is easy to make.  All you have to do is decorate it and fill it and you are complete.
The base of mine is Garden Green and So Saffron and Petal Patch DP.  The image is actually a digi stamp from Cuddly Buddy
I hope that this tutorial helps you out.  If you ever have any questions, just feel free to ask!
I'd love to see what you came up with ~ if you try it send me a link, I'd love to see it. 

Have a super great day!

Monday, May 03, 2010

Mod Podge of cards

Good Morning everyone!  I hope that today finds you well and dry.  Danielle is home from school today ~ they closed the schools.  We had so much rain over the weekend that lots of schools here are closed due to flooding.  And as I'm looking out the window I can't beleive it - it's so sunny and warm out.  Yes, we do need the rain but not all at once.  I look out the other window and I see that Elkhorn Creek is way over it's banks.  There is water up to the back doors of the neighbors houses. 

I think that I'll stay in and just work on some cards.  I have a couple of cards to show you, but I can't seem to find the recipies for them.  They are around here someplace, just not where I need them to be at the moment.  If there is something that you want to know about, just leave me a comment and I'll figure it out for you.
I had made some cards a while back for Danielle's teacher and she asked for something for a little boy that had something to do with a fire truck.  I found this image over at Mo's Digital Pencil.  Isn't he the cutest?  Only having Danielle and never a little boy I like to make cards for them.  Go check out Mo's - I'm sure that you'll find something there you like...  just be sure to come back Ü
Something about this card that I just love.  Maybe it is the black with the colors?  The pink and the green?  The polka dots?  I dunno, I just like it...

For some reason this image reminds me of Danielle.  I don't know why either.  Maybe it's just the "fashion-ista" ~ but it just does.  Actually if it was a phone in her hand and not an ipod then it would be her Ü  But then that would describe most of the population of teenager's wouldn't it?  I'm constantly being told "this does not go with that" or "wear this, not that".  I swear, how did I survive all these years without her?  he he he...

I'm off to go create something.  Don't forget, Mother's day is only 6 day's away.  Are your cards made?\

Have a great day!