


Here it is, the bunny box tutorial ~ and in time to make these for Easter!! This is a LONG post so stay with me ~ I hope that you enjoy!!
And remember you can click on any picture to make it larger. Just hit the back button to get back here.

Here is what you will need:
1 - 8 1/2" x 4 1/4" piece of Chocolate Chip cs
2 Top Note dies
1 - 8 1/2" x 1/2" strip of Chocolate Chip cs
4 wide oval punches in Chocolate Chip
2 small oval punches in Chocolate Chip
2 - 1 3/8" circle punches in Chocolate Chip
2 - 3/4" circle punches in Black
1 -1" circle punch in Chocolate Chip
2 - 1" circle punches in White
2 small oval punches in Pink
2 - 3/4" circle punches in Pink
2 - 1/2" circle punches in Pink
4 - 1/4" circle punches in Pink
1 word window punch in White
1 small heart punch in Pink
Close to Cocoa ink
2 small eyelets
Crop-a-dile (or other eyelet setter)
glue pen and zip dry glue
adhesive
cotton ball
white gel pen

The first thing you will do is make your box. Take your 8 1/2" x 4 1/4" piece of cardstock and score as shown above. I find it easier to add your adhesive for the top note dies before the box is created.

Crease your box and adhere together.

I goofed and added the back top note die before I added the handle. No big deal, but it is easier if you add the handle before adding the back and front to the box. Trust me, I found this out the hard way Ü
Take your strip of paper and punch holes 1/2" from each end. Then take your box and punch a hole on each side 1/2" from the top. Add your eyelets, but don't squeeze them too tight so you will have a little "give" and the handle will move freely. I'm sure that you can use brads but eyelets are a lot more sturdy and your handle will last longer.
Now you'll want to sponge your Close to Cocoa ink around all your pieces before you adhere them together. I didn't do the pink parts for the feet but you can - it's up to you. There are no rules, it's whatever you feel like.

This is what your box should be looking like now with the handle and the back attached.

Now you will take 1 of the wide Chocolate Chip ovals and 1 small pink oval and attach together. Then add some adhesive to the bottom corner of the ovals and attach under the top note die.

Take your small oval Chocolate Chip punched piece and attach it to the outer corner of the ear. Just so it looks a little "floppy". Do so for both sides.

Now that both the ears are complete you should have something like this.

Let's work on the feet now. Take your other two wide oval Chocolate Chip pieces and attach to the bottom corners of your top note die. Have them stick out a little bit.

You will take your 3/4", 1/2" and 1/4" circle pieces and attach them with your glue pen as shown. Repeat for both feet.

Now you will take your 1 3/8" brown circles together and cut just a tiny bit off of them.

Just a little bit to make them fit flush together.

Take your word window punch and cut it in half.

This is hard to explain ~ but take your two circles and put them flush together. Then lift up one side and add the "tooth" under and adhere.

Lift the other side up and adhere the other "tooth". Make sure that they are straight and flush. Then adhere your brown circles together - yes, flush.
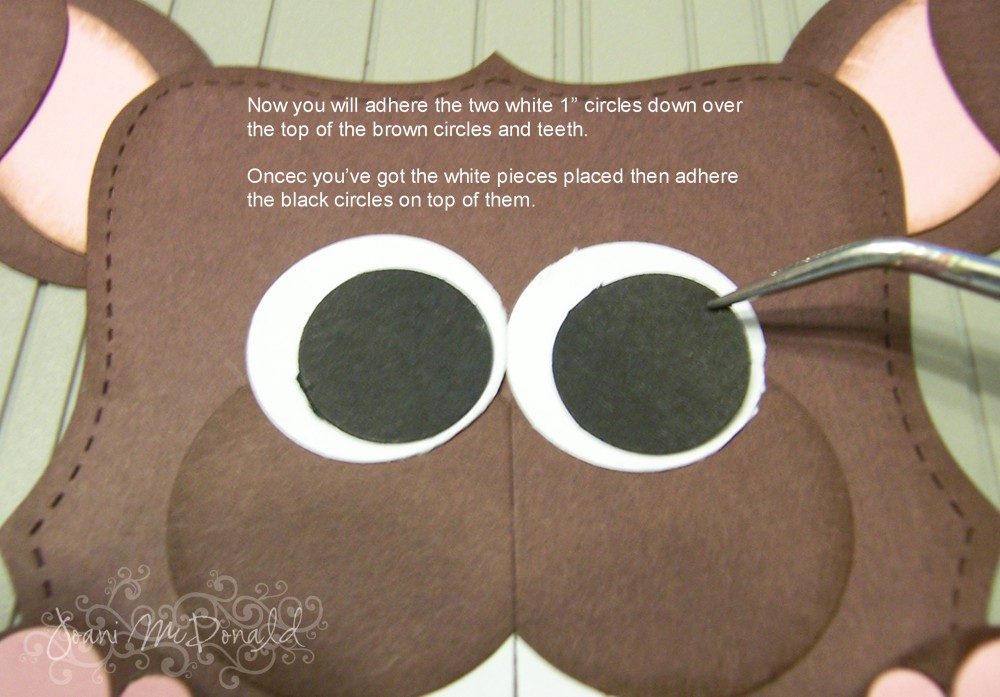
Ok, on to the eyeballs. Take your two 1" white circles and glue them over the top of the brown circles. Once you've done that take your two black 3/4" circles and glue them on top of the white ones.

You will now take your 1" brown circle and cut it in half. Add a pop dot to the back side and attach it to the top of the eyeball - these are your eyelids. Make sure that you use your white gel pen on the black part of the eye. You will add the pink ♥ just under the white of the eyes, this is his nose.

Once you have all the pieces attached peel the tape liner off the box and add him to the front. But wait!! We are not done yet!

Take your zip dry paper glue (or any other type of wet glue that you like) and add a big glop to the back side of the box. We still need to attach his tail!

Once the tail is attached set it aside to dry, and we are done!!
I'd love to see what you came up with. Leave me a comment with the link and I'll check it out! I told you it was a long post!
Have a great day!


5 comments:
awwww...this is sooo cute...lovely project...thanks for this fantastic tutorial..<3
thanks for the tutorial Joanie, these are so stinkin cute!! Blessings, Renee
They are so cute
My kids will love them. Better get creating
OMG this is SOO CUTE!!
Absolutely adorable!
Post a Comment